
Max Liboiron posed this excellent round-up of DIY microscopes in response to a query on the GOSH! google group – see the whole thing over at the Civic Laboratory for Environmental Action Research (CLEAR) blog: DIY Microscopes | Round-up from Civic Laboratory
Microscopes are ubiquitous tools in science, providing a visual bridge between the world we see with our eyes, and microscopic worlds we cannot otherwise detect. We use microscopes in most of our studies at Civic Laboratory to do forensic analysis on plastics (or suspected plastics!) we find.
Here is a short resource list for open source, do-it-yourself microscopes:

The Foldscope.
Foldscope: Origami-Based Paper Microscope
The Foldscope is an ultra-low-cost origami-based approach for large-scale manufacturing of microscopes, specifically demonstrating brightfield, darkfield, and fluorescence microscopes. Merging principles of optical design with origami enables high-volume fabrication of microscopes from 2D media. It requires paper, a ball lens, a 3V button battery, an LED light, a switch, and copper tape. Altogether, it costs under a dollar to make. If you’re a fancy scientist, it can also be adapted to darkfield , florenscense, and lens array versions. Here is the article that outlines how to build your own: http://journals.plos.org/plosone/article?id=10.1371/journal.pone.0098781

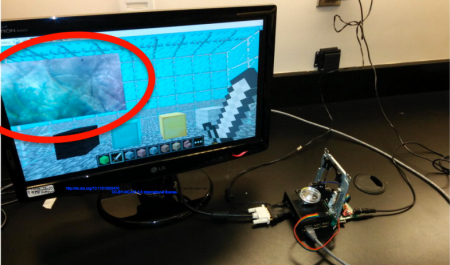
The Waterscope.
Waterscope
The Wasterscope is a 3D printed microscope invented by Richard Bowman. You can print the parts yourself since the project is open source, or you can order a kit. It is a digital microscope and uses a digital camera in addition to the printed pieces. It has a simple but sophisticated focusing system that flexes the plastic to bring the lens closer or farther from the viewing platform.

A hacked phone sporting a lens from a laser pointer.
Mobile Phone Field Microscope
The following pages from Hackteria show images of how you can mount different lenses onto your smart phone to make it into a simple microscope with very few extra parts. There isn’t a lot of text, but the premise is simple: mount a lens, or even a drop of water on a slide, a small distance from the lens on your phone’s camera, and the added distance + lens creates magnification. You can try a number of different lenses, from water droplets to lenses from webcams to laser pointer lenses.

Smart phone conversion with stage by Instructables.
Smartphone Conversion /w Stage
If you’re looking for more concrete instructions to convert your smartphone into a microscope than what Hackteria offers, there is a step by step guide on Instructables that includes building a stable stage for the phone. The stage costs about $10 and can magnify things between 175-375x depending on the number of lenses you add. Required materials include plywood, plexiglass, LED click light, laster pointer lens, and nuts and bolts.

Hackteria’s DIY webcam microscope.
Hackteria’s DIY microscopy /w webcam
Hackteria has an excellent step-by-step, concept-by-concept guide to building a microscope with a webcam that includes a stable observation stage. Since webcams are cheap and often found in waste streams, this is a nicely accessible camera. It has three parts: a converted webcam, an observation platform, and a light (an LED). Materials include a webcam, cardboard, foamboard, screws, duct tape (classic!), hot glue, and rubber bands. The instructions are also clear, and come in 12 languages. They give you the option to gussy it up with switches, batteries, etc, but they also provide the very basic version. The nice thing about Hackteria’s overview is that they teach you enough that you can innovate and hack on your own.
Full step by step guide is here: http://hackteria.org/wp-content/uploads/2013/05/hm3-hackteria-pages.pdf

USB webcam microscope by StoneTurners.
USB Microscope from StoneTurners
Like Waterscope, you can build StoneTurners’ USB Microscope yourself, or you can buy a kit with all the parts for 15 pounds. They use a USB webcam, a twist container, cardboard or MDF, self-adhesive neoprene strops, and hot glue.
And then hook it up to social media…
Controlling DIY Microscopes with social media and video games.
Pelling Lab created a 3D printed DIY microscope using a webcam, but the twist is that they added software that allowed it to be controlled by Twitter and Minecraft: “The Twitter-embodiment enabled users to send “tweets” directly to the microscope. Image data acquired by the microscope was then returned to the user through a Twitter reply and stored permanently on the photo-sharing platform Flickr, along with any relevant metadata. Local control of the microscope was also implemented by utilizing the video game Minecraft, in situations where Internet connectivity is not present or stable. A virtual laboratory was constructed inside the Minecraft world and player actions inside the laboratory were linked to specific microscope functions. Here, we present the methodology and results of these experiments and discuss possible limitations and future extensions of this work.”

Laser Cut Stage for Webcam Microscope by GMU
Laser Cut Stage for Webcam Microscope by GMU
If you’re looking for something with a little more polish and have access to a laser cutter, then GMU has instructions and plans for a webcam microscope with a beautiful laser cut body.

Carboni’s DIY stereoscopic microscope.
DIY Stereographic Microscope
A steeographic microscope works differently than the ones above; the sample is observed from two slightly different angles at low magnification to obtain two slightly different images, which when combined produce a three-dimensional view. The open source tool invented by G. Carboni is quite sophisticated and is suited for serious microscope enthusiasts. It hacks binoculars. Materials required include achromatic lenses, binoculars, wood or chipboard, rubber plugs, steel bars, aluminum plates, knobs, steel cable, and other building supplies. All tools are garage-variety: hacksaw for cutting metal, files, calipers, set-square, a marker, etc.
An update is here: http://www.funsci.com/fun3_en/uster3/uster3.htm

Carboni’s One Dollar Compound Microscope.
One-dollar Compound Microscope
Rather than hacking webcams and cameras, this inexpensive but beautiful compound microscope repurposes lenses from disposable cameras. Giorgio Carboni’s design is a true compound microscope, which uses two lenses instead of a simple microscope that uses only one, and achieves a magnification of about 75x. Not huge, and the other microscopes on this page get greater magnification hacking digital tools, but this is a learning microscope based on traditional scopes and is excellent for learning (and aesthetics!).

DIY version of van Leeuwenhoke’s XVII century microscope.
Antoni van Leeuwenhoek’s Microscope
Antoni van Leeuwenhoek (1632-1723) built one of the first microscopes. As such, it was a DIY project! The instructions here (again by Giorgio Carboni), tell you how to build this historical instrument. It’s quite sophisticated and requires soldering and metal cutting (since it’s made of metal!), but a dedicated hacker could make a cardboard version.
Further Reading for the hardcore among us:
Home Made Bio Electronic Arts Do-it-yourself: Microscopes, Sensors, Sonifications – Christoph Merian Verlag / Migros-Kulturprozent: Dominik Landwehr, Verena Kuni (Ed.), 2013
DIY Microscopes | Civic Laboratory.